"Custom" tools
5 April 2009 - 4:34pm
Everyone that has read a workshop manual knows that many jobs require a "custom tool". This often means a tool which is not available to "the man in the street".
However, this thread is looking at "tools" that are aimed at making it easier for you to maintain your bike.
BATTERIES
Looking at the price of batteries it is clear that these need to me looked after - not to mention the inconvenience when the batteries lets you down ....
The Optimate type units have been discussed, and are the second step in maintaining the battery.
The first step is monitoring the fluid levels of each cell in the battery. Sounds easy enough, just open the cap and "check the level" - yeah right .... In the photo below the battery is difficult to get to, and impossible to see the side which shows how high the fluid levels should be.
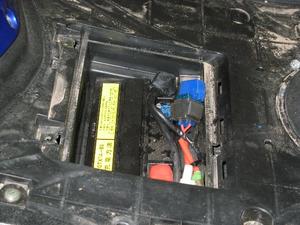 Motorcycle battery
STEP 1 - Make SURE if it is a "sealed" battery before you force the cover open to check the fluid level !!
STEP 2 - Open each cell and check the fluid level.
This sounds so easy - yet I often see the fluid and am not sure if it is "high enough". Thus I often end up over filling the cells. This then causes the battery fluid to spill out when you ride again.
So HOW can you be SURE that the fluid levels are correct? Look at the sketch below. It is from a standard motorcycle battery, showing the "max" and "min" marks on the side of the battery, as well as the indentation of the caps.
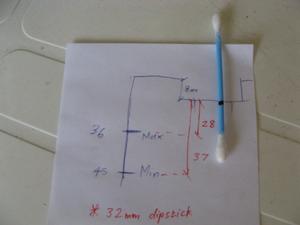 Battery level - dimensions
For this particular battery the hight, measured from the level of the caps should be between 28 and 37 mm. Thus if you made a "dipstick" you could measure the hight of the fluid. Similar to the dipstick you use to check oil levels. Except oil is dark enough to level a "mark" on the dipstick - battery fluid is not. So use an earbud, and make a mark at 30 mm from the tip on the stem. Submerge the earbud until this mark is at the cap level. Take out and see if it is wet. If not you can repeat this process and submerge the earbud a bit more, and check again. If you reach the maximum depth and the earbud remains dry you need to add distilled water to the battery.
NOTE If the earbud is "wet" there is ACID on it - AVOID skin contact and dispose safely !!
 Motorcycle battery
STEP 1 - Make SURE if it is a "sealed" battery before you force the cover open to check the fluid level !!
STEP 2 - Open each cell and check the fluid level.
This sounds so easy - yet I often see the fluid and am not sure if it is "high enough". Thus I often end up over filling the cells. This then causes the battery fluid to spill out when you ride again.
So HOW can you be SURE that the fluid levels are correct? Look at the sketch below. It is from a standard motorcycle battery, showing the "max" and "min" marks on the side of the battery, as well as the indentation of the caps.
 Battery level - dimensions
For this particular battery the hight, measured from the level of the caps should be between 28 and 37 mm. Thus if you made a "dipstick" you could measure the hight of the fluid. Similar to the dipstick you use to check oil levels. Except oil is dark enough to level a "mark" on the dipstick - battery fluid is not. So use an earbud, and make a mark at 30 mm from the tip on the stem. Submerge the earbud until this mark is at the cap level. Take out and see if it is wet. If not you can repeat this process and submerge the earbud a bit more, and check again. If you reach the maximum depth and the earbud remains dry you need to add distilled water to the battery.
NOTE If the earbud is "wet" there is ACID on it - AVOID skin contact and dispose safely !!
5 April 2009 - 5:07pm
#1
CHAIN TENSION
We all know that chain tension is important. Most of us have adjusted this in the past, and we know that it is "tricky" to measure the EXACT play on the chain.
So here is another quick tool to make your life easy. Take a 16 mm truncking and cut a length of roughly 150 mm (6 inches oom Cheezy). The whole idea is that the cover slides easily on the trunking.
Now make sure of the free chain play required for your bike. On a F650GS the free play is between 35 and 45 mm. So on the cover of the truncking mark the end and then also 35 and 45 mm from the end, as shown below:
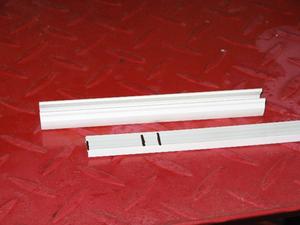 markings on truncking
Put the cover on the truncking and slide it "down". Hold the trunking against the swingarm, press the chain as high as it will go and slide the cover of the truncking upward untill the edge reaches the middle of the chain. Now just hold the trunking in place and pull the chain down, ideally it should be between the two marks.
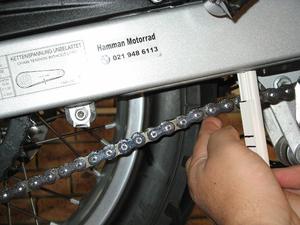 Allign trunking cover to upper limit of chain
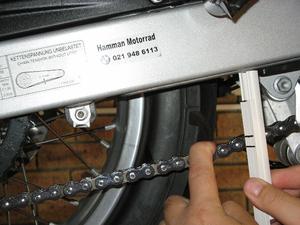 Now just check the lower limit of the chain ....
NOTE Once done, sit on the bike and get a friend to see if the chain has "some" free play. On many bikes the chain goes tighter as the bike is loaded. If you intend riding with a pillion also check for "some" free play on the chain with two people on the bike.
 markings on truncking
Put the cover on the truncking and slide it "down". Hold the trunking against the swingarm, press the chain as high as it will go and slide the cover of the truncking upward untill the edge reaches the middle of the chain. Now just hold the trunking in place and pull the chain down, ideally it should be between the two marks.
 Allign trunking cover to upper limit of chain
 Now just check the lower limit of the chain ....
NOTE Once done, sit on the bike and get a friend to see if the chain has "some" free play. On many bikes the chain goes tighter as the bike is loaded. If you intend riding with a pillion also check for "some" free play on the chain with two people on the bike.
5 April 2009 - 5:10pm
#2
Please share your "tips" for bike maintenance ....
5 April 2009 - 5:39pm
#3
Thanks Chris :-)
This is way to precise for me :-) I just test the chain tension with my foot... I can see if it's too tight or too slack ;-)
Besides I've given up on chain maintenance... Charles convinced me :-) I just replace the chain and sprockets when I need to.. Every 10 000km.
Another test is to push the bike backwards... If the chain gets picked up the sprocket you know the sprocket is 'hooked' and needs to be replaced.
7 April 2009 - 11:26am
#4
Any other tips or tools ???

